如何在 OpenGL 中创建 "Concave/Convex Circle Illusion"
How to create a "Concave/Convex Circle Illusion" in OpenGL
这个学期,我在学校学习计算机图形学课程,我们的第一个作业是创造一个concave/convex幻觉。
这是我应该创建的示例:
Concave/Convex Circle Illusion
我试图自己解决这个问题,但我总是卡住。我知道如何创建灰色背景,我知道如何创建一个圆圈。我不知道该怎么做是让圆圈看起来像图片。我知道如何用纯色填充它,我只是不知道如何用多种颜色填充它并像图片中那样淡化它。
所以这是我的 C++ 代码,我们 运行 在 Visual Studio 15.
#include <cstdlib>
#include <glut.h>
#include <math.h>

const double p = 3.14159/180;

void circle(float r){
     glColor3f(1.0,0.0,0.0);
     glBegin(GL_LINE_LOOP);
     for (int i=100; i <= 460; i++){
         double degree = p*i;
         double x = cos(degree) * r;
         double y = sin(degree) * r;
         glVertex2d(x,y);
     }
     glEnd();
}

/*

//This circle function was my attempt at creating the illusion shown in the picture above.
//I tried to break up the circle into separate pieces and make them each a different color,
//but unfortunately it didnt come out like the picture above.

void circle (float radius){
     glColor3f(0.0,0.0,0.0); // black
     glBegin(GL_POLYGON);
        glVertex2i(21,21);
        glVertex2i(25,19);
        glVertex2i(28,17);
        glVertex2i(32,16);
        glVertex2i(36,17);
        glVertex2i(40,19);
        glVertex2i(43,21);
     glEnd();
     glColor3f(0.329412,0.329412,0.329412);  // dim grey
     glBegin(GL_POLYGON);
        glVertex2i(21,21);
        glVertex2i(19,25);
        glVertex2i(17,30);
        glVertex2i(48,30);
        glVertex2i(46,25);
        glVertex2i(43,21);
     glEnd();
     glColor3f(0.752941,0.752941,0.752941);  // grey
     glBegin(GL_POLYGON);
        glVertex2i(17,30);
        glVertex2i(16,35);
        glVertex2i(15,40);
        glVertex2i(50,40);
        glVertex2i(49,35);
        glVertex2i(48,30);
     glEnd();
     glColor3f(0.650024,0.650024,0.650024);  // light grey
     glBegin(GL_POLYGON);
        glVertex2i(15,40);
        glVertex2i(16,45);
        glVertex2i(17,50);
        glVertex2i(48,50);
        glVertex2i(49,45);
        glVertex2i(50,40);
     glEnd();
     glColor3f(0.8,0.8,0.8);  //  very light grey
     glBegin(GL_POLYGON);
        glVertex2i(17,50);
        glVertex2i(20,55);
        glVertex2i(45,55);
        glVertex2i(48,50);
     glEnd();
     glColor3f(1.0,1.0,1.0);  // white
     glBegin(GL_POLYGON);
        glVertex2i(20,55);
        glVertex2i(23,58);
        glVertex2i(25,60);
        glVertex2i(28,62);
        glVertex2i(32,63);
        glVertex2i(36,62);
        glVertex2i(40,60);
        glVertex2i(43,58);
        glVertex2i(45,55);
     glEnd();
}

*/


void display(void){
     glClear(GL_COLOR_BUFFER_BIT);
     glColor3f(0.658824,0.658824,0.658824);
     glBegin(GL_POLYGON); //Creates the gray background
        glVertex2i(10,10);
        glVertex2i(390, 10);
        glVertex2i(390,290);
        glVertex2i(10,290);
     glEnd();
     circle(30);
     glFlush();
}


void main(int argc, char** argv){
     glutInit(&argc, argv);
     glutInitDisplayMode(GLUT_SINGLE | GLUT_RGB);
     glutInitWindowSize(400, 300);
     glutInitWindowPosition(200,100);
     glutCreateWindow("Project 1");
     glClearColor(0.0,0.0,0.0,0.0);
     glMatrixMode(GL_PROJECTION);
     glLoadIdentity();
     gluOrtho2D(0.0,400.0,0.0,300.0);
     glutDisplayFunc(display);
     glutMainLoop();
}
所以我已经记下了大部分代码,只是无法弄清楚圆圈的颜色。
任何可以使我的代码的结果看起来像上面的示例图片的 advice/help 将不胜感激。
谢谢!
按 glBegin/glEnd 序列绘制已弃用多年。
阅读 Fixed Function Pipeline and see Vertex Specification and Shader 了解最先进的渲染方式。
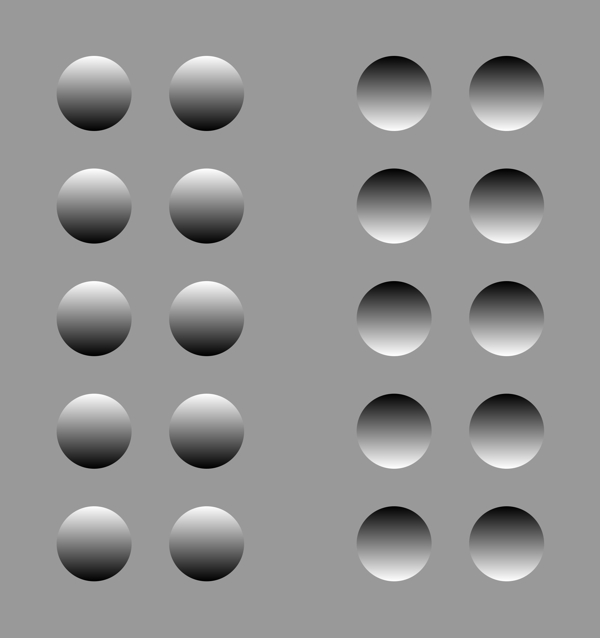
但是,图片的效果是通过简单的灰色渐变实现的。背景是灰色的,圆圈内是从白到黑的线性渐变。
glClear, clear the framebuffer by the color which is set by glClearColor.
设置灰色清除颜色以创建灰色背景:
glClearColor( 0.5f, 0.5f, 0.5f, 1.0f );
glClear(GL_COLOR_BUFFER_BIT);
要创建颜色渐变,您必须通过 glColor3d, before you set the vertex coordinate by glVertex2d. The color is interpolated between the vertices. Use the primitive type GL_TRIANGLE_FAN 设置颜色属性以创建填充多边形:
const double p = 3.14159/180;

void circle(float r, bool flip ){

     glBegin(GL_TRIANGLE_FAN);
     glColor3d( 0.5, 0.5, 0.5 );
     glVertex2d( 0.0, 0.0 );
     for (int i=0; i <= 360; i++)
     {
         double degree = p*i;
         double c = cos( degree );
         double s = sin( degree );

         double col = s * 0.5 + 0.5;
         if ( flip )
           col = 1.0 - col;
         glColor3d( col, col, col );
         glVertex2d( c*r, s*r );
     }
     glEnd();
}
draw 函数可能如下所示:
void display(void){
     glClearColor( 0.5f, 0.5f, 0.5f, 1.0f );
     glClear(GL_COLOR_BUFFER_BIT);

     glMatrixMode( GL_MODELVIEW );
     glLoadIdentity();

     for ( int x = 0; x < 2; ++ x )
     {
       for ( int y = 0; y < 2; ++ y)
       {
           glPushMatrix();
           glTranslated( 120.0 + 160.0*x, 100.0+100*y, 0.0f );
           circle(30, x > 0);
           glPopMatrix();
       }
     }

     glFlush();
}
预览:
这个学期,我在学校学习计算机图形学课程,我们的第一个作业是创造一个concave/convex幻觉。
这是我应该创建的示例:
Concave/Convex Circle Illusion
我试图自己解决这个问题,但我总是卡住。我知道如何创建灰色背景,我知道如何创建一个圆圈。我不知道该怎么做是让圆圈看起来像图片。我知道如何用纯色填充它,我只是不知道如何用多种颜色填充它并像图片中那样淡化它。
所以这是我的 C++ 代码,我们 运行 在 Visual Studio 15.
#include <cstdlib>
#include <glut.h>
#include <math.h>
const double p = 3.14159/180;
void circle(float r){
glColor3f(1.0,0.0,0.0);
glBegin(GL_LINE_LOOP);
for (int i=100; i <= 460; i++){
double degree = p*i;
double x = cos(degree) * r;
double y = sin(degree) * r;
glVertex2d(x,y);
}
glEnd();
}
/*
//This circle function was my attempt at creating the illusion shown in the picture above.
//I tried to break up the circle into separate pieces and make them each a different color,
//but unfortunately it didnt come out like the picture above.
void circle (float radius){
glColor3f(0.0,0.0,0.0); // black
glBegin(GL_POLYGON);
glVertex2i(21,21);
glVertex2i(25,19);
glVertex2i(28,17);
glVertex2i(32,16);
glVertex2i(36,17);
glVertex2i(40,19);
glVertex2i(43,21);
glEnd();
glColor3f(0.329412,0.329412,0.329412); // dim grey
glBegin(GL_POLYGON);
glVertex2i(21,21);
glVertex2i(19,25);
glVertex2i(17,30);
glVertex2i(48,30);
glVertex2i(46,25);
glVertex2i(43,21);
glEnd();
glColor3f(0.752941,0.752941,0.752941); // grey
glBegin(GL_POLYGON);
glVertex2i(17,30);
glVertex2i(16,35);
glVertex2i(15,40);
glVertex2i(50,40);
glVertex2i(49,35);
glVertex2i(48,30);
glEnd();
glColor3f(0.650024,0.650024,0.650024); // light grey
glBegin(GL_POLYGON);
glVertex2i(15,40);
glVertex2i(16,45);
glVertex2i(17,50);
glVertex2i(48,50);
glVertex2i(49,45);
glVertex2i(50,40);
glEnd();
glColor3f(0.8,0.8,0.8); // very light grey
glBegin(GL_POLYGON);
glVertex2i(17,50);
glVertex2i(20,55);
glVertex2i(45,55);
glVertex2i(48,50);
glEnd();
glColor3f(1.0,1.0,1.0); // white
glBegin(GL_POLYGON);
glVertex2i(20,55);
glVertex2i(23,58);
glVertex2i(25,60);
glVertex2i(28,62);
glVertex2i(32,63);
glVertex2i(36,62);
glVertex2i(40,60);
glVertex2i(43,58);
glVertex2i(45,55);
glEnd();
}
*/
void display(void){
glClear(GL_COLOR_BUFFER_BIT);
glColor3f(0.658824,0.658824,0.658824);
glBegin(GL_POLYGON); //Creates the gray background
glVertex2i(10,10);
glVertex2i(390, 10);
glVertex2i(390,290);
glVertex2i(10,290);
glEnd();
circle(30);
glFlush();
}
void main(int argc, char** argv){
glutInit(&argc, argv);
glutInitDisplayMode(GLUT_SINGLE | GLUT_RGB);
glutInitWindowSize(400, 300);
glutInitWindowPosition(200,100);
glutCreateWindow("Project 1");
glClearColor(0.0,0.0,0.0,0.0);
glMatrixMode(GL_PROJECTION);
glLoadIdentity();
gluOrtho2D(0.0,400.0,0.0,300.0);
glutDisplayFunc(display);
glutMainLoop();
}
所以我已经记下了大部分代码,只是无法弄清楚圆圈的颜色。
任何可以使我的代码的结果看起来像上面的示例图片的 advice/help 将不胜感激。
谢谢!
按 glBegin/glEnd 序列绘制已弃用多年。
阅读 Fixed Function Pipeline and see Vertex Specification and Shader 了解最先进的渲染方式。
但是,图片的效果是通过简单的灰色渐变实现的。背景是灰色的,圆圈内是从白到黑的线性渐变。
glClear, clear the framebuffer by the color which is set by glClearColor.
设置灰色清除颜色以创建灰色背景:
glClearColor( 0.5f, 0.5f, 0.5f, 1.0f );
glClear(GL_COLOR_BUFFER_BIT);
要创建颜色渐变,您必须通过 glColor3d, before you set the vertex coordinate by glVertex2d. The color is interpolated between the vertices. Use the primitive type GL_TRIANGLE_FAN 设置颜色属性以创建填充多边形:
const double p = 3.14159/180;
void circle(float r, bool flip ){
glBegin(GL_TRIANGLE_FAN);
glColor3d( 0.5, 0.5, 0.5 );
glVertex2d( 0.0, 0.0 );
for (int i=0; i <= 360; i++)
{
double degree = p*i;
double c = cos( degree );
double s = sin( degree );
double col = s * 0.5 + 0.5;
if ( flip )
col = 1.0 - col;
glColor3d( col, col, col );
glVertex2d( c*r, s*r );
}
glEnd();
}
draw 函数可能如下所示:
void display(void){
glClearColor( 0.5f, 0.5f, 0.5f, 1.0f );
glClear(GL_COLOR_BUFFER_BIT);
glMatrixMode( GL_MODELVIEW );
glLoadIdentity();
for ( int x = 0; x < 2; ++ x )
{
for ( int y = 0; y < 2; ++ y)
{
glPushMatrix();
glTranslated( 120.0 + 160.0*x, 100.0+100*y, 0.0f );
circle(30, x > 0);
glPopMatrix();
}
}
glFlush();
}
预览: