如何将按钮添加到悬挂在上方的底部导航栏 - Flutter
How to add button to bottom navigation bar which hang out above - Flutter
我有一个底部导航栏,中心项目看起来像这张图片:
如何在Flutter中实现这样的东西?
我发现我放入 BottomNavigatonBarItem 的每个图标都位于导航栏的边界内。但我需要它挂在上面。
您可以 Stack 将小部件显示在彼此的顶部。
结合 属性 overflow: Overflow.visible 和符合您需要的对齐方式。
以下示例将实现您图片中的效果:浮动按钮水平居中,顶部与底部栏对齐。
return new Scaffold(
  bottomNavigationBar: new Stack(
    overflow: Overflow.visible,
    alignment: new FractionalOffset(.5, 1.0),
    children: [
      new Container(
        height: 40.0,
        color: Colors.red,
      ),
      new Padding(
        padding: const EdgeInsets.only(bottom: 12.0),
        child: new FloatingActionButton(
          notchMargin: 24.0,
          onPressed: () => print('hello world'),
          child: new Icon(Icons.arrow_back),
        ),
      ),
    ],
  ),
);
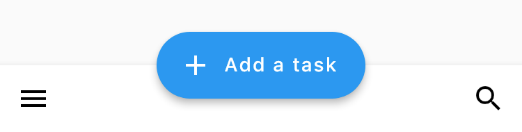
Google 最近添加了一个叫做 BottomAppBar 的东西,它提供了一种更好的方法。只需在脚手架中添加 BottomAppBar ,创建一个导航 FAB,如果您希望它有文本,则在 FAB 中添加一个标签。创建与此类似的结果:https://cdn-images-1.medium.com/max/1600/1*SEYUo6sNrW0RoKxyrYCqbg.png.
Widget build(BuildContext context) {
  return new Scaffold(
    appBar: AppBar(title: const Text('Tasks - Bottom App Bar')),
    floatingActionButton: FloatingActionButton.extended(
      elevation: 4.0,
      icon: const Icon(Icons.add),
      label: const Text('Add a task'),
      onPressed: () {},
    ),
    floatingActionButtonLocation:
      FloatingActionButtonLocation.centerDocked,
    bottomNavigationBar: BottomAppBar(
      hasNotch: false,
      child: new Row(
        mainAxisSize: MainAxisSize.max,
        mainAxisAlignment: MainAxisAlignment.spaceBetween,
        children: <Widget>[
          IconButton(
            icon: Icon(Icons.menu),
            onPressed: () {},
          ),
          IconButton(
            icon: Icon(Icons.search),
            onPressed: () {},
          )
        ],
      ),
    ),
  );
}
您也可以像这样使用 FloatingActionButtonLocation 和 Expanded 小部件来执行此操作:
Widget build(BuildContext context) {
    return new Scaffold(
      appBar: new AppBar(
        title: new Text(widget.title),
      ),
      body: _buildTodoList(),
      floatingActionButton: new FloatingActionButton(
        onPressed: _pushAddTodoScreen,
        tooltip: 'Increment',
        child: new Icon(Icons.add),
        elevation: 4.0,
      ),
      bottomNavigationBar: BottomAppBar(
        child: new Row(
          mainAxisAlignment: MainAxisAlignment.center,
          children: <Widget>[
            Expanded(child: IconButton(icon: Icon(Icons.home)),),
            Expanded(child: IconButton(icon: Icon(Icons.show_chart)),),
            Expanded(child: new Text('')),
            Expanded(child: IconButton(icon: Icon(Icons.tab)),),
            Expanded(child: IconButton(icon: Icon(Icons.settings)),),
          ],
        ),
      ),
      floatingActionButtonLocation: FloatingActionButtonLocation.centerDocked,
    );
  }
预览:
除了@Raunak 的输入之外,您还可以使用 FloatingActionButton 的 "border" 属性来获得无缝边框以生成所需的效果 - 代码片段如下:
Widget buildFab() {
  FloatingActionButton fab = FloatingActionButton(
    backgroundColor: Color(0xFF9966CC),
    child: Icon(Icons.add),
    shape: CircleBorder(
      side: BorderSide(
        color: Colors.white,
        width: 3.0,
      ),
    ),
    tooltip: "Add...",
    onPressed: () {
      print("fab is pressed!!!");
    }
  );

  return fab;
}
如果将 FAB 包裹在 Material 中并为其添加阴影效果会更好 - 如下所示:
Material buildFabWithShadow() {
  return Material(
  shadowColor: Color(0x802196F3),
  shape: CircleBorder(),
  elevation: 16.0,
  child: buildFab(),
);
尝试后得到如下效果1- 请注意,边框宽度可以根据您的需要进行调整!
我有一个底部导航栏,中心项目看起来像这张图片:
如何在Flutter中实现这样的东西?
我发现我放入 BottomNavigatonBarItem 的每个图标都位于导航栏的边界内。但我需要它挂在上面。
您可以 Stack 将小部件显示在彼此的顶部。
结合 属性 overflow: Overflow.visible 和符合您需要的对齐方式。
以下示例将实现您图片中的效果:浮动按钮水平居中,顶部与底部栏对齐。
return new Scaffold(
bottomNavigationBar: new Stack(
overflow: Overflow.visible,
alignment: new FractionalOffset(.5, 1.0),
children: [
new Container(
height: 40.0,
color: Colors.red,
),
new Padding(
padding: const EdgeInsets.only(bottom: 12.0),
child: new FloatingActionButton(
notchMargin: 24.0,
onPressed: () => print('hello world'),
child: new Icon(Icons.arrow_back),
),
),
],
),
);
Google 最近添加了一个叫做 BottomAppBar 的东西,它提供了一种更好的方法。只需在脚手架中添加 BottomAppBar ,创建一个导航 FAB,如果您希望它有文本,则在 FAB 中添加一个标签。创建与此类似的结果:https://cdn-images-1.medium.com/max/1600/1*SEYUo6sNrW0RoKxyrYCqbg.png.
Widget build(BuildContext context) {
return new Scaffold(
appBar: AppBar(title: const Text('Tasks - Bottom App Bar')),
floatingActionButton: FloatingActionButton.extended(
elevation: 4.0,
icon: const Icon(Icons.add),
label: const Text('Add a task'),
onPressed: () {},
),
floatingActionButtonLocation:
FloatingActionButtonLocation.centerDocked,
bottomNavigationBar: BottomAppBar(
hasNotch: false,
child: new Row(
mainAxisSize: MainAxisSize.max,
mainAxisAlignment: MainAxisAlignment.spaceBetween,
children: <Widget>[
IconButton(
icon: Icon(Icons.menu),
onPressed: () {},
),
IconButton(
icon: Icon(Icons.search),
onPressed: () {},
)
],
),
),
);
}
您也可以像这样使用 FloatingActionButtonLocation 和 Expanded 小部件来执行此操作:
Widget build(BuildContext context) {
return new Scaffold(
appBar: new AppBar(
title: new Text(widget.title),
),
body: _buildTodoList(),
floatingActionButton: new FloatingActionButton(
onPressed: _pushAddTodoScreen,
tooltip: 'Increment',
child: new Icon(Icons.add),
elevation: 4.0,
),
bottomNavigationBar: BottomAppBar(
child: new Row(
mainAxisAlignment: MainAxisAlignment.center,
children: <Widget>[
Expanded(child: IconButton(icon: Icon(Icons.home)),),
Expanded(child: IconButton(icon: Icon(Icons.show_chart)),),
Expanded(child: new Text('')),
Expanded(child: IconButton(icon: Icon(Icons.tab)),),
Expanded(child: IconButton(icon: Icon(Icons.settings)),),
],
),
),
floatingActionButtonLocation: FloatingActionButtonLocation.centerDocked,
);
}
预览:
除了@Raunak 的输入之外,您还可以使用 FloatingActionButton 的 "border" 属性来获得无缝边框以生成所需的效果 - 代码片段如下:
Widget buildFab() {
FloatingActionButton fab = FloatingActionButton(
backgroundColor: Color(0xFF9966CC),
child: Icon(Icons.add),
shape: CircleBorder(
side: BorderSide(
color: Colors.white,
width: 3.0,
),
),
tooltip: "Add...",
onPressed: () {
print("fab is pressed!!!");
}
);
return fab;
}
如果将 FAB 包裹在 Material 中并为其添加阴影效果会更好 - 如下所示:
Material buildFabWithShadow() {
return Material(
shadowColor: Color(0x802196F3),
shape: CircleBorder(),
elevation: 16.0,
child: buildFab(),
);
尝试后得到如下效果1- 请注意,边框宽度可以根据您的需要进行调整!